Technique Project #15:
Drawing in Perspective Part II
Drawing in Perspective Part II
|
Goal of this project
In this project we want to increase our abilities to compose a from life by understanding more fully the principles of drawing in perspective. |
Supplies Needed
Your drawing pencils Drawing Paper Your ruler Your Gum Eraser Drawing Board Stack of Books or boxes |
Step-by-Step Instructions
1. Stack your items, either books or boxes, in such a way that the angles are moving in slightly different directions. This way you are seeing simultaneous "perspectives" at one time.
2. Focus on the structure of the still life objects, but keep a good distance from the objects to have enough room to see the objects properly.
3. Use your pencil, held vertically in your hand, and adjust your fingers on the pencil to measure the visual length and width of your objects. Keep your hand extended as far as possible and your elbow locked to keep the measurements accurate.
4. Begin drawing your books/boxes. Know that these objects are made up of parallel lines, which will affect each other in the drawing.
5. Lines that are perpendicular should all match up.
6. Adjust lines as necessary to keep the drawing in perspective. It helps to draw lightly. The darker your lines are the more "solid" they feel and "unmovable" they feel.
7. Leave any "wrong" lines there to help you adjust and learn what is going to help you get the angles correct. Actually, you can't "get this wrong" because it is PRACTICE! You are engaging in the process of training your eyes/brain/hand to work in concert translating a 3D reality onto a 2D sheet of paper and that is a "problem" to solve! Just take your time and practice. Art is a practice.
8. Use your ruler, if you like, to help you keep your lines parallel and straight.
9. Draw your lines straight through the objects so that you can be aware of what is going on behind the objects. This also helps you to not "curve" your line when you get close to the "edge" of the object.
10. Don't be afraid of running off the edge of the paper, so that you aren't forcing the drawing to fit into the space, which will skew the perspective.
11. Stay conscious and aware of your body position throughout the drawing so that the perspective stays the same.
12. Practice this project frequently to strengthen your ability to draw in perspective.
Artistic Food for Thought
Angles are everywhere! You can practice this any time and any place you have your sketchbook with you. Try to draw also interior spaces and exterior spaces. Really use the perspective techniques I talk about in this video lesson and truly notice what is happening in the world around you with the lines and angles. It is actually kind of fun and mind blowing when you start seeing how these lines are truly working together.
Angles are everywhere! You can practice this any time and any place you have your sketchbook with you. Try to draw also interior spaces and exterior spaces. Really use the perspective techniques I talk about in this video lesson and truly notice what is happening in the world around you with the lines and angles. It is actually kind of fun and mind blowing when you start seeing how these lines are truly working together.
Technique Project #16:
This Painting is a Piece of Cake!
inspired by Wayne Thiebaud
This Painting is a Piece of Cake!
inspired by Wayne Thiebaud
|
Goal of this project
Practicing confidence in understanding perspective within the context of painting a still life from observation! |
Supplies Needed
A Piece of Cake Yellow, Red, Blue, & White Acrylic Paint Drawing Board Paint Brushes Water Cup & Spray water bottle Palette Gessoed Rives BFK, roughly 10x11 1/4" Artist tape |
Step-by-Step Instructions
1. Tape down your gessoed Rives BFK paper.
2. Make sure your piece of cake is a wedge shape and light it from the side with your light source.
3. Start painting from life the piece of cake beginning with the basic shapes.
4. Put in the background to ground the object in space.
5. Feel free to use more juiced up or bold colors based on the reality but not necessarily true to life. You can consider your understanding of color theory when you are playing with the palette of colors you choose to mix for this painting.
6. Block in areas of color, working from general shapes and colors towards more specific details as you go.
7. Pay attention to areas of the object in shadow and feel free to exaggerate the shadow colors in those areas. I love to use a really fun blue mixture for shadows.
8. Once you've blocked in the basic shapes, continue working wet-into-wet and start adding the feeling of texture and volume into your painting.
9. Work with varied brush strokes to create visual interest. Different sizes and shapes of brushes as well as the way you move your brush can assist in this approach.
10. Use your water bottle to spray the painting to keep it wet as you work.
Additional Resources
Check out the paintings of Wayne Thiebaud! (pronounced tee-bow) Look at how the colorful shapes clearly define the structure of these delectable still life paintings!
Check out the paintings of Wayne Thiebaud! (pronounced tee-bow) Look at how the colorful shapes clearly define the structure of these delectable still life paintings!
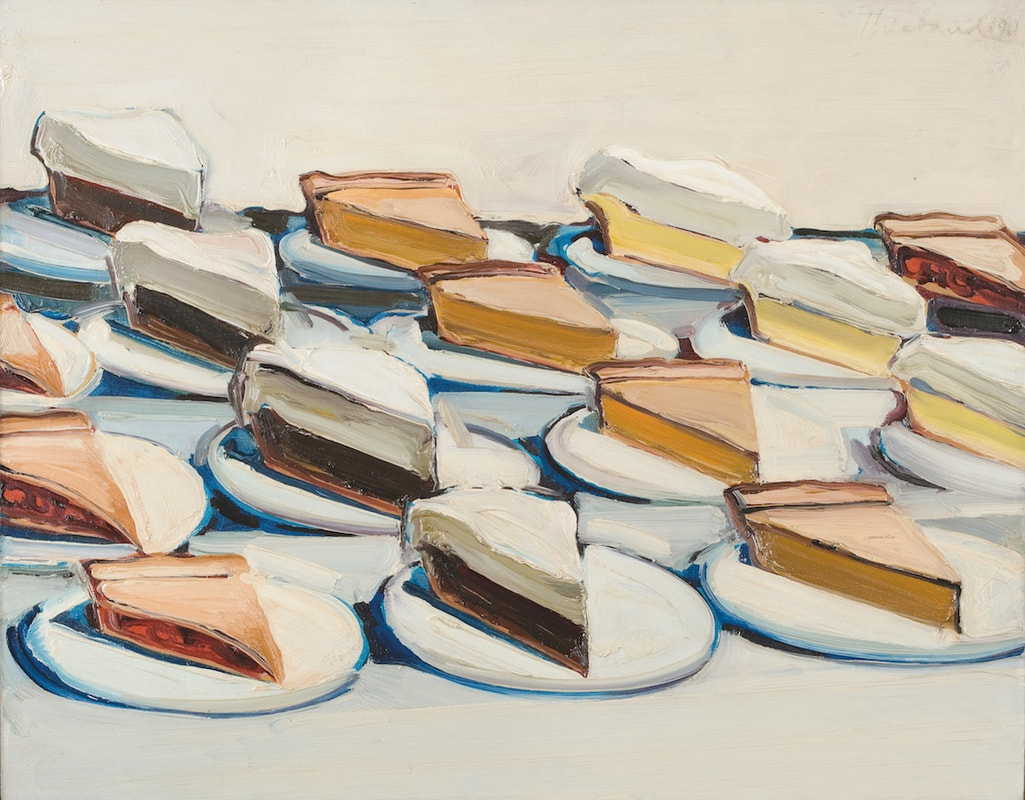
Pies Wayne Thiebaud
1961 Oil on Canvas 20x30 inches |
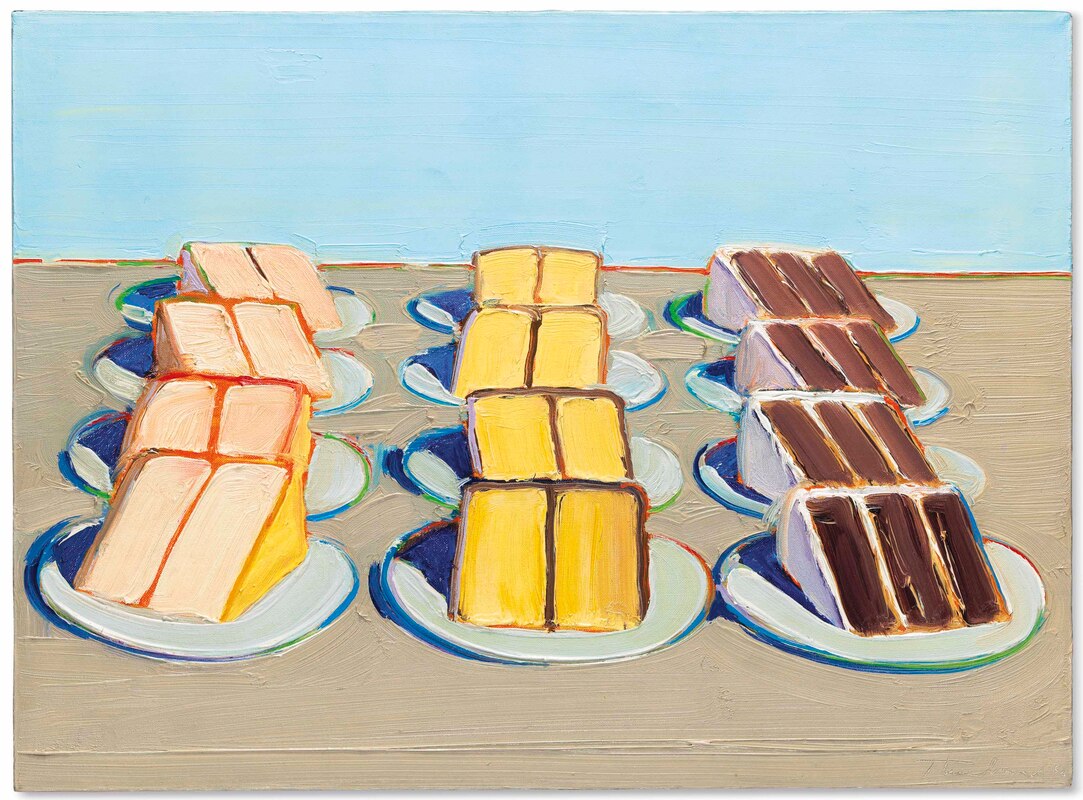
Cake Rows Wayne Thiebaud
1962 Oil on Canvas 16x22 inches |
Design Challenge #8: Adding Layers & Texture to your Visual Journal
|
|
Supplies Needed
Your Visual Journal or Drawing Paper Vellum Paper to print black & white digital photo on Embroidery or sewing thread Needle & Scissors Ruler (optional) Drawing Pencil Acrylic Paint Clear Acrylic Medium - Such as Tar Gel |
Step-by-Step Instructions
1. Digitally alter your photo of choice to make it black and white using an image editing program (such as PicMonkey online). Once you have turned your photo into B + W you can then choose to truly blast out and increase the contrast, if you like, to increase the "graphic" feel of the photo, eliminating many of the subtle grays and creating more clear space on the vellum for other colors to show through in your journal.
2. Print your photo onto the vellum paper.
3. Embellish your vellum printed photo with embroidery or sewing thread.
4. Adjust the image to create an interesting composition, layering it over top of a background you have already painted or drawn.
5. Sew the image onto the page in your visual journal OR you could choose to glue the image down to the page.
6. Bring in other elements to add visual interest adding in multiple layers. You can draw with a colored pencil or paint with acrylic paint or mix in other mediums.
7. Consider al the elements in your mixed media piece to make certain each layer is harmoniously working together and "talking to each other".
8. Have fun! Enjoy the process and consider what materials and elements of design you enjoy working with, that truly feel like you. What portions of this process feel challenging or uncomfortable for you? Did you discover something new you would like to try some more? Exercises like these are where personal sense of design and vision are created!
Additional Resources
Pic Monkey.com or Canva.com can be used for photo editing for free online
Pic Monkey.com or Canva.com can be used for photo editing for free online
Art Talk #8: Using Shape to Define Form
See this art talk lesson by watching the video below!
Go through the slides for this art talk lesson below at your own pace!
