Technique Project #1:
The Pencil Line Game
The Pencil Line Game
Goal of this project
To explore your full range of drawing pencils and synch up your hand and eye to work together. Explore the value shifts (lightness and darkness) that occur when hand pressure changes within each pencil. Learn the value changes capable within each drawing pencil and thus your full range.
To explore your full range of drawing pencils and synch up your hand and eye to work together. Explore the value shifts (lightness and darkness) that occur when hand pressure changes within each pencil. Learn the value changes capable within each drawing pencil and thus your full range.
Step-by-Step Instructions
1. Place drawing paper on your drawing board or smooth drawing table
2. Get out your range of pencil, ordering them hardest to softest (F, 4H, 2H, H, HB, 2B, 4B, 6B)
3. Draw two dots on your paper (fairly close together, not more than two inches apart)
4. Place your pencil on the first dot and then, without the use of a ruler using only your hand and eye, draw a straight line to the second dot
5. Place a second set of dots on your paper, now this time a little further apart, repeat drawing a line from one to the other
6. Repeat this process, now placing the dots even further apart on your paper, increasing the distance and also challenging your hand/eye coordination to draw a straight line
7. Repeat this process with each pencil in your full range of drawing pencils
8. Now, do the same exercise with each pencil, but this time change the pressure of your hand as you draw the straight line from heavy pressure to lighter pressure.
9. Switch and attempt lighter pressure to heavier pressure. Notice how this changes the value (lightness/darkness) of the line. Notice the full value range available in each drawing pencil.
10. Take this exercise to another level by drawing a curly-Q or curved line from one dot to another. Then attempt doing this same curly-Q or curve line from one dot to another while increasing and decreasing hand pressure.
11. Notice how your eyes and hand begin to work together in a new way. Notice how much potential range of value (lightness/darkness) is available within each pencil and thus the full range of all of the drawing pencils. Notice how this exercise causes you to slow down and give attention to your drawing practice.
Technique Project #3
Chiaroscuro: Creating Areas of Value
with Pencil
Chiaroscuro: Creating Areas of Value
with Pencil
|
Visual Art Vocabulary
Chiaroscuro- Italian word meaning, Light/Dark or "out of darkness, light" is used to describe contrasts in value (lightness & darkness) to create a sense of Three-Dimensionality on a Two-Dimensional surface. |
Supplies Needed
Your range of drawing pencils from hard to soft (F, 4H, 2H, H, HB, 2B, 4B, 6B) Loose drawing paper Your Ruler or Measuring Stick Art Gum Eraser An extra sheet of paper as a cover sheet (resting your drawing hand on the graphite you have already placed on the paper can add oil to it and thus discolor the paper or smear the graphite you have already placed down) |
Goal of this project
Creating a value key or gradient to explore making whole "areas of value". Pushing the sense of value (light & dark) with the concept of layering areas of graphite pencil, increasing the softness of the pencil & thus the darkness as the gradient progresses
Creating a value key or gradient to explore making whole "areas of value". Pushing the sense of value (light & dark) with the concept of layering areas of graphite pencil, increasing the softness of the pencil & thus the darkness as the gradient progresses
Step-by-Step Instructions
1. Place drawing paper on your drawing board or smooth drawing table
2. Get out your range of pencil, ordering them hardest to softest (F, 4H, 2H, H, HB, 2B, 4B, 6B)
3. Draw two dots on your paper (fairly close together, not more than two inches apart)
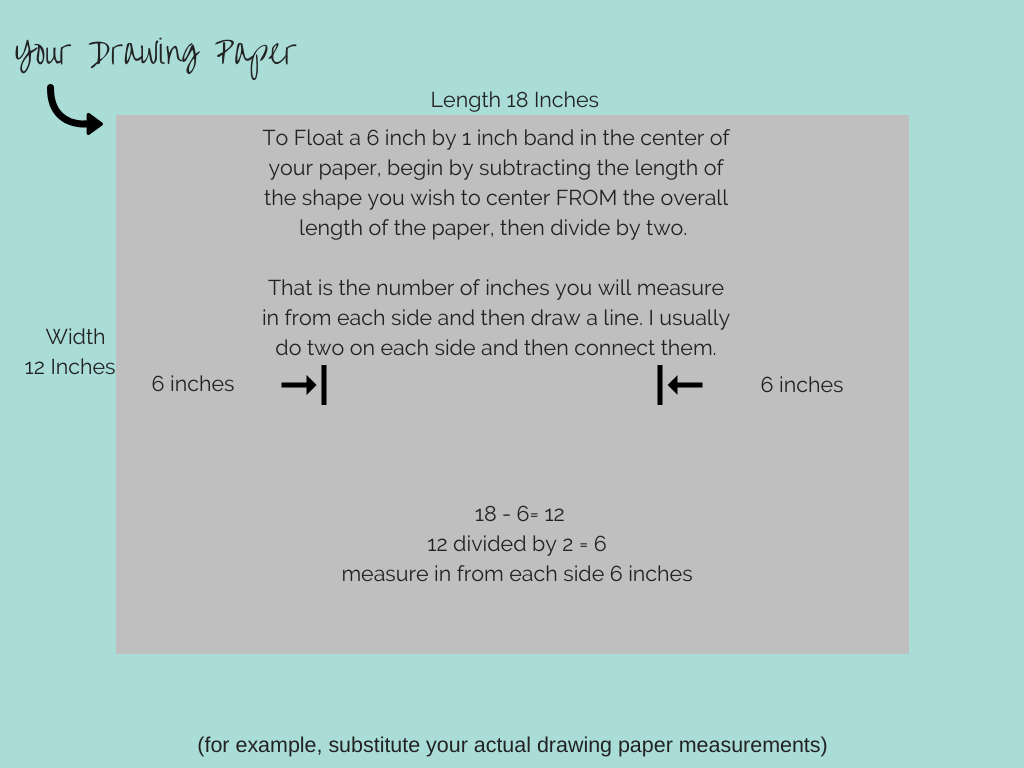
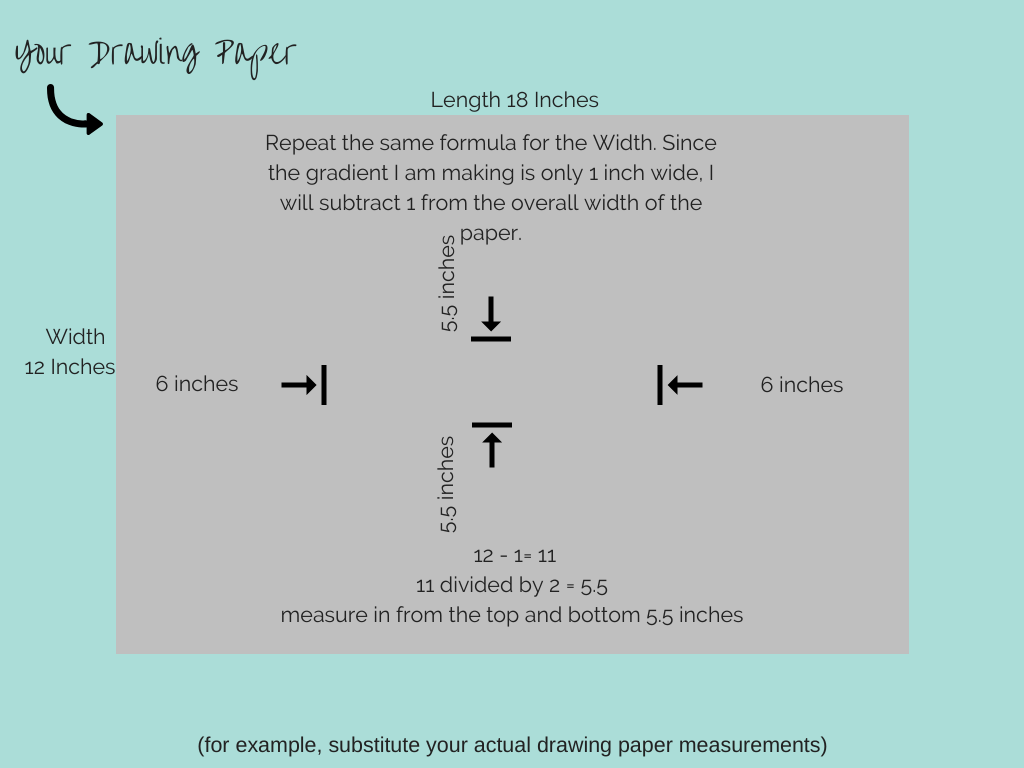
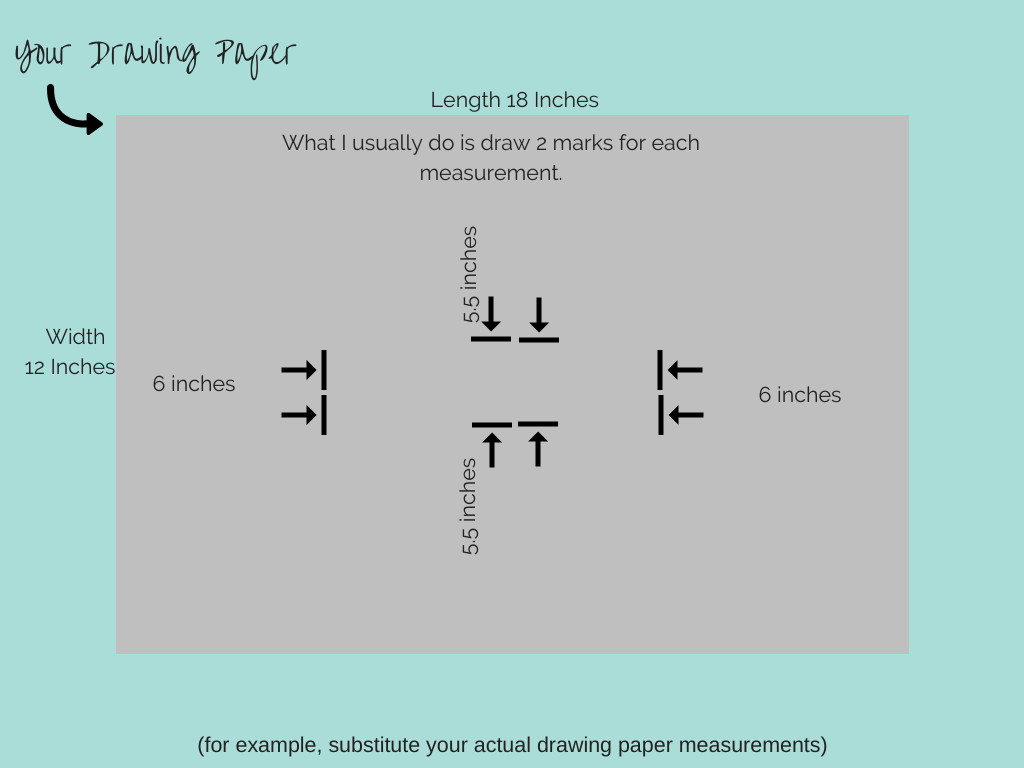
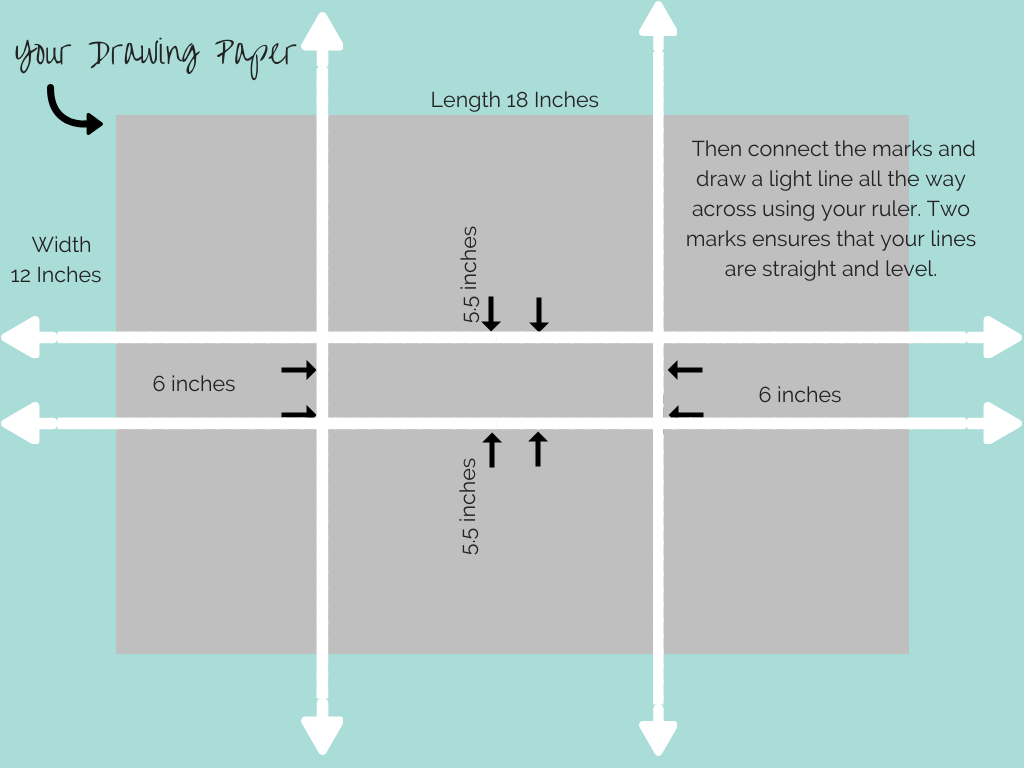
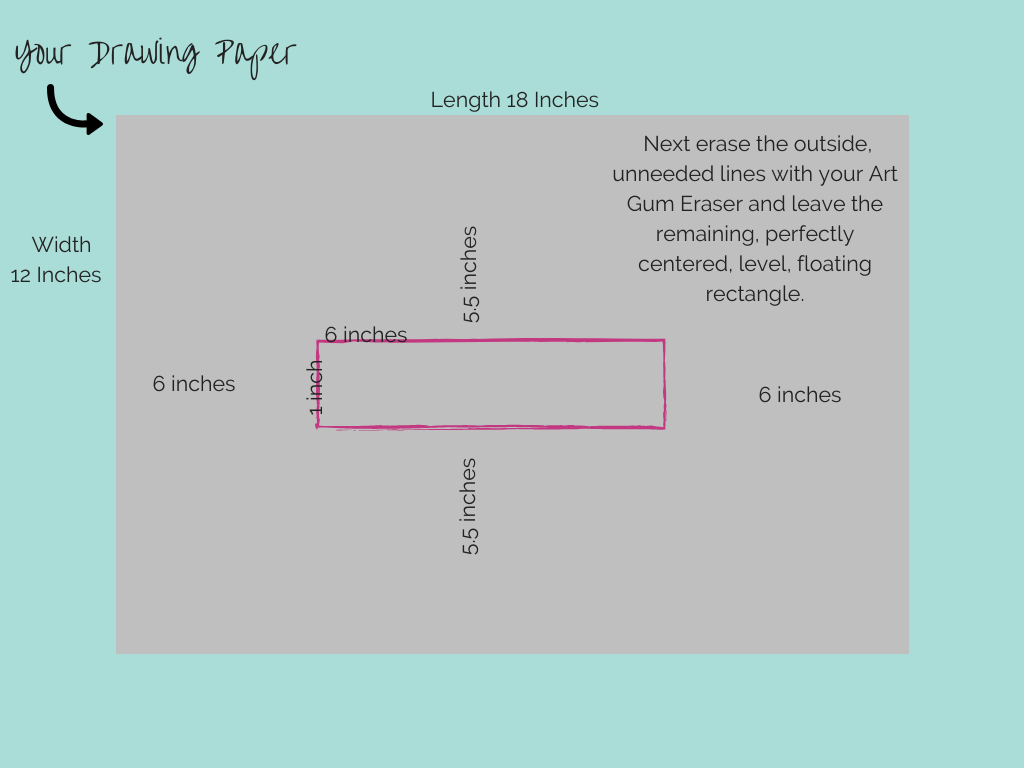
4. Create a 6"X1" rectangle centered in the middle of your drawing paper (follow the photo guide below for doing this).
1. Place drawing paper on your drawing board or smooth drawing table
2. Get out your range of pencil, ordering them hardest to softest (F, 4H, 2H, H, HB, 2B, 4B, 6B)
3. Draw two dots on your paper (fairly close together, not more than two inches apart)
4. Create a 6"X1" rectangle centered in the middle of your drawing paper (follow the photo guide below for doing this).
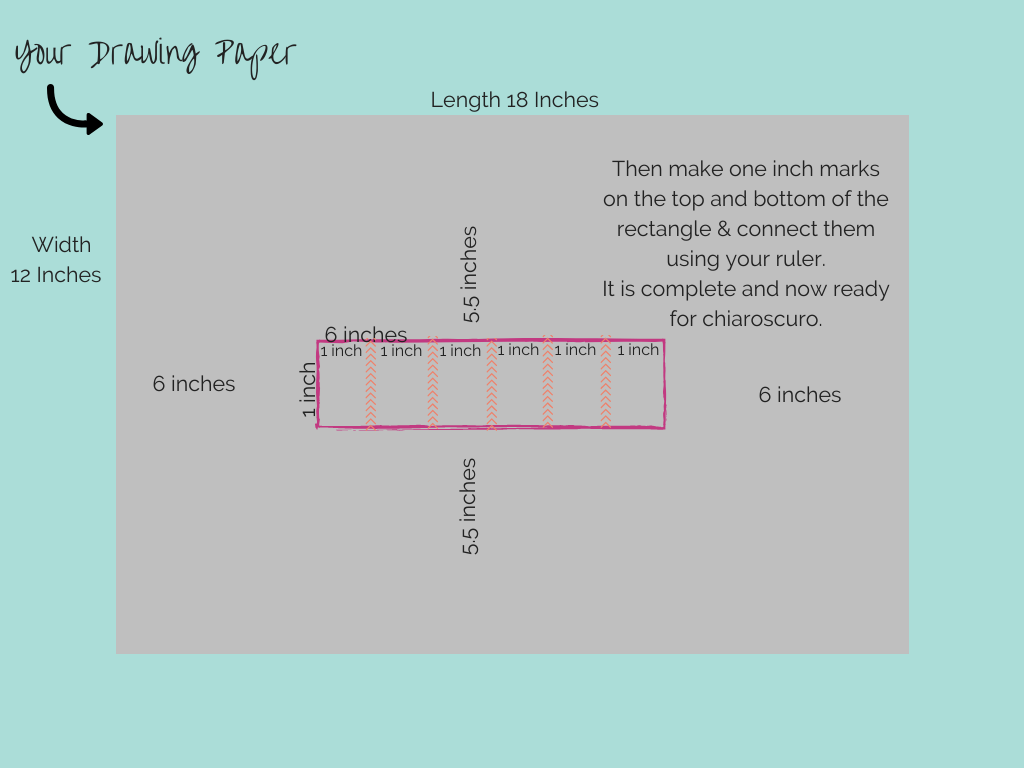
5. Begin with the hardest pencil in your range of pencils (2H for example) and start in the first box by working the area in small overlapping circular movements, paying attention to the lightness of pressure in your hand as you draw. Fill the entire square with an even area of value.
6. Move to the second square and do the same with your 2H or hardest pencil as the first square. Once complete, begin a second layer on that same square with the next softest pencil in your range, H for example.
7. Move on to the third square and work it in this gentle circular overlapping manner to create another area of value with your H pencil. Once complete add another layer of value to that same exact square using your HB pencil or your next softest pencil in your range.
8. Move onto the fourth square and create three layers of graphite in H, HB, and 2B to increase the darkness of value even further.
9. Move onto the fifth square and create another three layers of graphite in HB, 2B, & 4B to increase the darkness of value even further.
10. Move onto the sixth square and create another three layers of graphite in 2B, 4B, & 6B to increase to the darkness of the value as the darkest on your value gradient.
Technique Project #5:
Blind Contour Drawing
Blind Contour Drawing
|
|
Supplies Needed
Your range of drawing pencils from hard to soft (F, 4H, 2H, H, HB, 2B, 4B, 6B) Loose drawing paper A mirror |
Goal of this project
Further linking the relationship of the hand and the eye with the continuous movement of the contour line. Observing the subject matter and studying it beyond the mark making on the paper.
Visual Art Vocabulary
Blind Contour- A type of drawing in which the artist does not look at the paper or the "result" of the mark making as the drawing is progressing. The pencil or mark making tool touches down upon the surface and continues moving for the short duration of the drawing without being lifted.
Step-by-Step Instructions
1. Place drawing paper on your drawing board or smooth drawing table
2. Get out your range of pencils
3. Place a mirror on your drawing table so that you can easily see your face, while still comfortable drawing on your paper
4. Follow the instructions in the video tutorial. Blind Contour Drawing means; observing the model, keeping eyes off of the paper and only on the subject matter (in this case, your reflection), once you place your pencil down do not lift it again until the drawing is complete
5. Set a timer for 1 minute at first, then attempt shorter amounts of time as you continue these drawings. I recommend doing at least 10 of them! Try towards the end of your drawing session doing only 30 second Blind Contour Drawings! A stopwatch, cell phone timer or kitchen timer are great tools. You can even have a drawing partner or friend time you by looking at their watch.
6. Have fun with the Picasso-esque results!
Technique Project #6:
Apply the Chiaroscuro Technique
to Drawing from Life
Apply the Chiaroscuro Technique
to Drawing from Life
|
|
Supplies Needed
Your range of drawing pencils from hard to soft (F, 4H, 2H, H, HB, 2B, 4B, 6B) Loose Drawing Paper Ruler A small sheet of paper for cover sheet Art Gum Eraser A desk lamp or clamp light An egg or a small ball |
Goal of this project
To begin applying the chiaroscuro technique to drawing from life and exploring the full range of value in a simple form. Explore from observation the effects of light on an object.
Visual Art Vocabulary
Horizon Line- The point where the sky and ground would meet in a landscape.
Shading- In two-dimensional work, the depiction of relative darkness in areas where light has been partially blocked.
Step-by-Step Instructions
1. Take out your loose drawing paper.
2. Get out your range of pencils
3. Set up a small and very simple still life using one egg. I like to place my egg on a white piece of paper and typically also tack up another white piece of paper behind it to give me a fully clean background.
4. Set up your desk lamp or clamp light so that it casts an interesting shadow underneath the egg. Move it around at several different angles until you find a composition that interests you. Remember, the shadows are really what make this project interesting. Watch how different a little movement of the light changes the shadow drastically.
5. Create a centered box to be the format of your composition. Use the method we practiced in the previous module (The Value Gradient Project) for doing so.
6. Begin with your lightest/hardest pencil first to lightly draw in your composition. Please note that drawing a "horizon line" which is where the surface that your object is resting on and the background meet (in this case, the table and the background meet at a horizon, just as would happen in a landscape where the land and the sky would meet would be the horizon line.
7. Begin creating a map of value areas by lightly drawing in the lines of where darker and lighter value areas meet. Observe these shapes closely and draw them as they really are, not as you believe they should be! This is super important to remember because often times our brain tries to get in the way of what we are doing and start.
8. Slowly build up the areas of value using the chiaroscuro method of layering up to softer/darker pencils. Leave the lighter areas light. Leave the mid tone areas. Pay close attention to how the shape of your subject matter locks in with the shape of the cast shadow.
9.Have fun! You are drawing from life using a time honored method! Nicely done.
Technique Project #7: Squaring Up
|
|
Supplies Needed
Fine Point Sharpie or other permanent black marker with a fine tip (micron pens are also amazing) A magazine photo portrait (as large as the page preferably) or a photograph of high resolution printed on 8x10 paper Drawing Pencils & Ruler |
Goal of this project
To learn the technique for enlarging images using relative measuring.
To learn the technique for enlarging images using relative measuring.
Step-by-Step Instructions
1. I would encourage you to attempt a 1 to 2 ratio for this first attempt at "Squaring Up".
2. Choose a photograph or magazine photo . Using your ruler and fine point sharpie marker, measure it out at one inch intervals on all sides of the photo.
3. Use your ruler and fine point sharpie marker to create a grid on the photo.
4. On your paper create a centered box that is 2 times the size of the photo you are enlarging. If you measured the photo at 1 inch intervals, that would mean that this new box would be at 2 inch intervals. For example: 4 inch by 4 inch photograph would be an 8 inch by 8 inch enlargement for the drawing.
5. Use your ruler to create a grid in pencil within the box on your drawing paper.
6. Now use the photograph with grid as a guide to draw the shapes within your new (larger) grid on the drawing paper. I recommend drawing very lightly with a 2H pencil.
7. Take your time. This is drawing and even though you are using a photo and grid as a guide, you still do need your attention.
8. If need be, you can draw a diagonal line across your squares in the grid to help give more relative clues for drawing the shapes within the boxes correctly.
9. This skill is incredibly helpful when creating more complex compositions or for other types of drawing & painting projects. We will use this skill/technique more throughout the course
Technique Project #9: Self-Portrait
in Graphite
in Graphite
|
|
Supplies Needed
A photograph of yourself (in the video tutorial I used a 4x6) Your drawing pencils Drawing Paper Your ruler Fine Point Permanent Black Pens/Markers Your Gum Eraser |
Goal of this project
To create an accurate portrayal self-portrait using a photograph, the squaring up method, and our graphite pencils.
We will use the full range of value (light & dark) to express the light and shadow and our chiaroscuro techniques to bring out our portrait. This is a great culmination of practicing the Pencil Line Game project from Module 1, the Value Gradient Project from Module 2, the Chiaroscuro Egg Drawing from Module 3, and the knowledge gained from translating a color photo into gray scale from the Design Challenge in Module 4!
Notice the importance of mastering values! When we can play with the full range of values in our art work, we can balance subtle light shifts to create art that is close to representational of life or we can push our abstraction further by playing with subtle shifts in light.
Step-by-Step Instructions
1. I prefer that a brand new photograph is taken and printed for this project. Make certain to create high contrast in the photograph (both light and dark). This will give you more visual information to draw. Most photographs edit out visual information, but we want to leave it in so that we can see all that is there and observe the subtleties of the value shifts. I like for the photograph to be cropped close in to show mostly the face and neck. The more information you include, the more you have to draw! It's best to keep it simple at first because the face has so much visual information.
2. Once you have your photograph printed, mark off the edges inch by inch and create a grid with your ruler and fine point sharpie or micron pen. You will see that my photograph in the video is a 4x6 inch photograph.
3. Create a centered drawing box in a 1:1 ratio on your drawing paper. You could always use the Squaring Up process to make your drawing larger, but I feel like there is enough to go on to simply do a 1:1 ratio.
4. After you create your centered drawing box, using your ruler, replicate the grid so that you can begin drawing.
5. Use the grids as a guide in drawing the main shapes of the face. Draw very lightly at first, using your 2H pencil.
6. Create a very lightly drawn visual map of AREAS OF VALUE. The face is not made up of lines, but it is made up of areas of value; light and dark shapes that are next to each other to give the appearance of a three-dimensional surface. We have to move out of thinking in lines and symbols. It is very tempting to begin drawing the symbol of the eye or the symbol of the nose that we have become familiar with over time. This will involve some unlearning. Observe what organic shapes are truly there.
7. Using the chiaroscuro method we have been practicing, create a light layer of value first before slowly building up to the darker areas of value with softer pencils. It can be very tempting to rush this process because we can see the darker value right away in the photograph, but the drawing will be built up slowly.
8. As you continue, make certain to use a cover sheet to keep your hand off of your drawing surface, you don't want to smear your gentle layers of graphite with the side of your drawing hand as you move your pencil around the surface of your portrait.
9. Keep checking in with the visual reference, in this case, the photograph. Your eyes should be going back and forth from the drawing to the photograph, constantly checking the accuracy of shapes you are creating with areas of value. If you find yourself staring at only your drawing, know that it will begin to slip away in it's accuracy. The visual reference is key. What shapes are truly there? Is this an accurate value translation in graphite from the color photograph?
10. Continue drawing! Share your in-progress works in our facebook group or via email! Ask for help if needed!
