Technique Project #1:
The Pencil Line Game
The Pencil Line Game
Step-by-Step Instructions
1. Place drawing paper on your drawing board or smooth drawing table
2. Get out your range of pencil, ordering them hardest to softest (F, 4H, 2H, H, HB, 2B, 4B, 6B)
3. Draw two dots on your paper (fairly close together, not more than two inches apart)
4. Place your pencil on the first dot and then, without the use of a ruler using only your hand and eye, draw a straight line to the second dot
5. Place a second set of dots on your paper, now this time a little further apart, repeat drawing a line from one to the other
6. Repeat this process, now placing the dots even further apart on your paper, increasing the distance and also challenging your hand/eye coordination to draw a straight line
7. Repeat this process with each pencil in your full range of drawing pencils
8. Now, do the same exercise with each pencil, but this time change the pressure of your hand as you draw the straight line from heavy pressure to lighter pressure.
9. Switch and attempt lighter pressure to heavier pressure. Notice how this changes the value (lightness/darkness) of the line. Notice the full value range available in each drawing pencil.
10. Take this exercise to another level by drawing a curly-Q or curved line from one dot to another. Then attempt doing this same curly-Q or curve line from one dot to another while increasing and decreasing hand pressure.
11. Notice how your eyes and hand begin to work together in a new way. Notice how much potential range of value (lightness/darkness) is available within each pencil and thus the full range of all of the drawing pencils. Notice how this exercise causes you to slow down and give attention to your drawing practice.
Design Challenge #1 :
Begin Creating Your Visual Journal
and Gesture Line Drawing
Begin Creating Your Visual Journal
and Gesture Line Drawing
|
Gesture Line Drawing and Beginning Your visual Journal from Court McCracken on Vimeo. |
Supplies Needed
Your Mixed Media Visual Journal Butcher's Tray or Paint Pallet Soft, round tip paint brush or wide larger flat tip brush Container for Water You may also want your spray bottle for water to keep paint wet means to keep t "open" or "workable" Either a small dot of acrylic paint or water color Loose drawing paper to practice Gesture Drawing Soft Pencil for gesture line drawing, such as 4B or 6B Jar of India Ink with dropper |
Goal of this project
To explore a new type of drawing, gesture drawing while beginning the process of creating texture & layering in our visual journals. Art happens in layers and there are many types of drawing & painting to explore. Layers one and two are just the beginning!
To explore a new type of drawing, gesture drawing while beginning the process of creating texture & layering in our visual journals. Art happens in layers and there are many types of drawing & painting to explore. Layers one and two are just the beginning!
Visual Art Vocabulary
Grounding- A thin under layer to a piece of art used to visually activate the surface. Commonly a thin wash of paint to begin "grounding" the surface of the painting.
Gesture Drawing- a type of drawing done quickly to understand the "essence" or "energy" of that which is being drawn. How are things connected? How do they move? Where is the tension in the object or pose of figure? Gesture drawing is commonly used as a warm up drawing before a longer drawing session. Often 10-20 gesture drawings are done in charcoal on newsprint at the beginning of a figure drawing class.
Step-by-Step Instructions
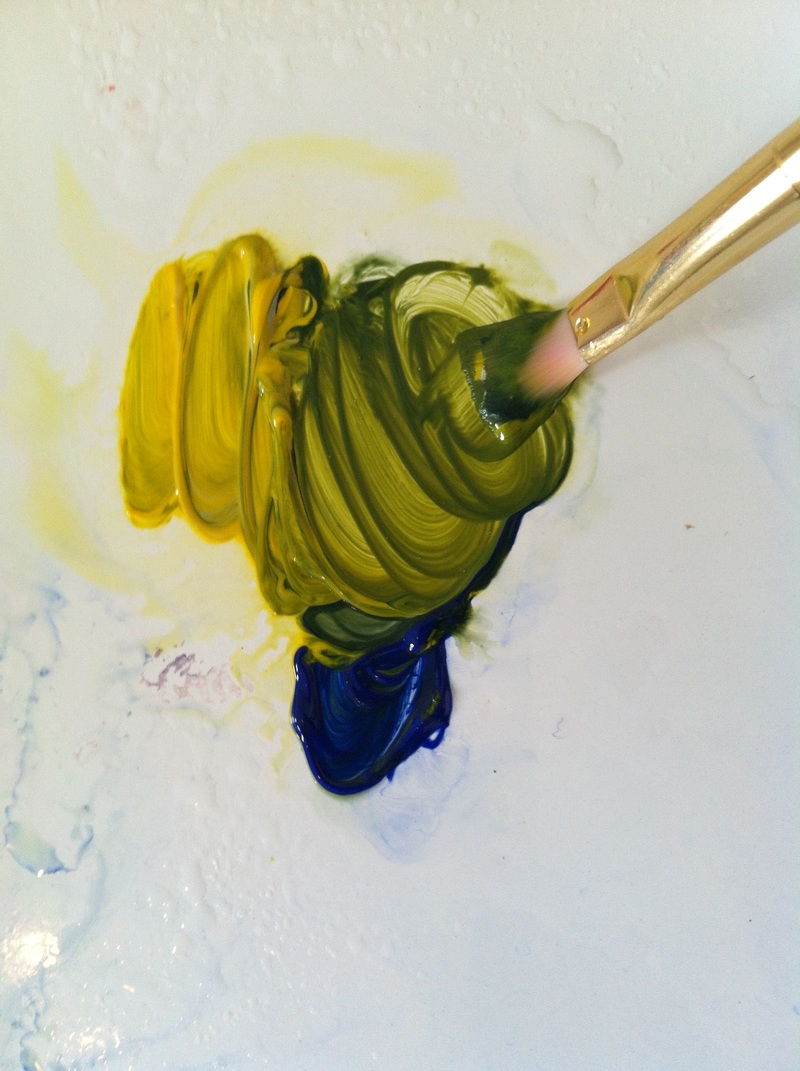
1. Begin by placing a small dot of your paint color or colors of choice.
2. Make certain to have a large container of clean water.
3. Place your brush in the water and touch it back to the paint and then back to the water and back to the paint, creating a very thinned out pigment to use on the surface of your paper.
4. Making certain to cover all of the paper, "wash" the paper with your watery paint, exploring a variety of brush strokes and movements with the pigment across the surface of the paint.
5. You want to make your "grounding" of the paper interesting, because even these subtle under painting marks will visually activate the surface of your art work.
6. I like to skip around and do this to several pages throughout my visual journal to begin the process of creating layers and interest throughout the entire journal so that it becomes one cohesive piece of art work, instead of simply individual pages.
6. Set aside your visual journal to dry.
7. Take out your loose drawing paper and soft pencils.
8. Choose an object from your home or nature. I love to use things that have an interesting point of connection (i.e. flower connected to stem), but things like seashells, sticks, pinecones, a hairbrush, a pair of scissors are all good options.
9. In gesture drawing, the most important things to remember are to move your whole arm, not just your wrist. Keep your pencil moving. Follow the object with your eyes and allow your pencil to move with your eyes. Don't spend too much time look at your paper. You want to be paying attention to your subject matter that you are drawing (the object). These drawings should be take only 5-10 seconds of time each.
10. Complete 5-10 of these drawings at minimum so that you have really warmed up your arm, your eyes, and your ability to synch up and understand the movement and energy of what you are drawing.
11. Get one of the grounded pages of your visual journal, it may still be a little bit wet and that is OK.
12. Take out your India Ink dropper and go straight to the page with the same gesture drawing energy using your object of choice as a subject matter. Use the dropper as you were using the pencil. When you need more ink, go back to the ink jar and squeeze more into the dropper.
13. You will want to let this page dry open before closing your visual journal or turning to a new page. You can attempt this exercise on multiple pages and multiples scales (i.e. smaller, larger, taking up one whole page or stretching across two whole pages!)
Technique Project #2: Mix It Up! Learn to Mix any Color in Acrylic Paint
|
|
Supplies Needed
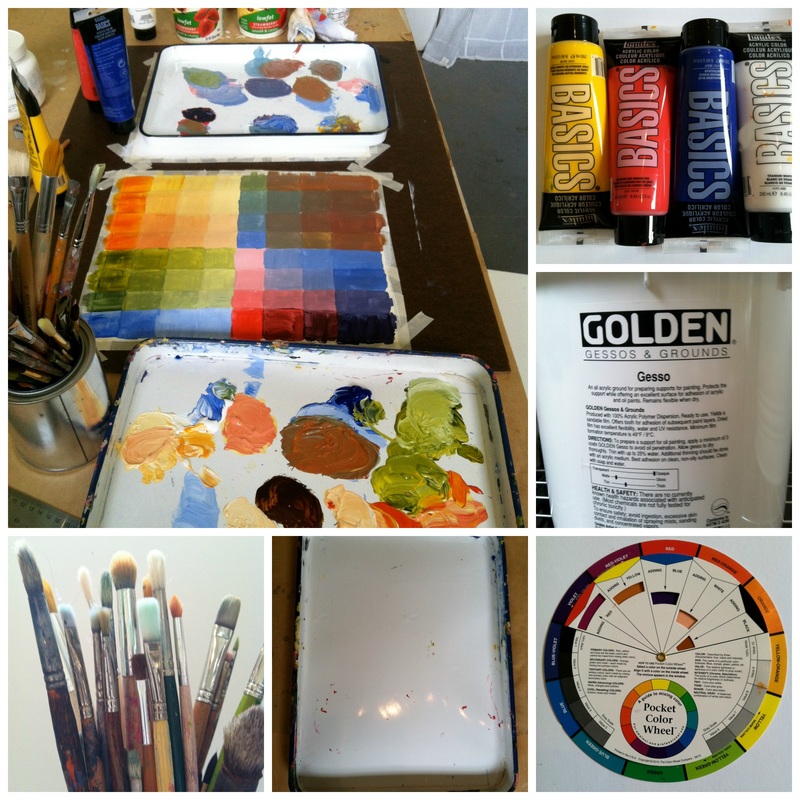
Your own color wheel (not required, but can be extremely helpful!) Painters Tape Rives BFK Paper (this often comes in 22x30 inches, but you can 'tear' your paper down to make a smaller color chart. If you want to get wild and do a huge one, that's OK too!) Acrylic Paint in Red, Blue, Yellow, White Gesso Larger Paint brush for applying Gesso Masonite Drawing/Painting Board Acrylic Paint Brushes Spray bottle for Water Rags for cleaning brushes Large containers for water Sandpaper Pencil & Rule for drawing out chart Goal of this project To deepen an understanding of how color functions, learning to utilize paint in it's fullness. Feel confident in color mixing abilities while pushing the boundaries of previous color mixing experiences. This project will also teach you how to handle and prepare Rives BFK paper for creating a painting surface which will be a skill we will refer back to time and again during this course. |
Visual Art Vocabulary
Hue- What color is it? Also known as the local color.
Value- How light or how dark is the color?
Intensity- How much color is in the color? How intense or how saturated is the color?
Complementary color- colors opposite each other on the color wheel
Analogous color- colors next to each other on the color wheel
Primary color-Red, Yellow, Blue
Secondary Color- colors made by mixing two primaries
i.e. blue + yellow = green
red + yellow = orange
blue + red = violet
Tertiary Color- a color made by mixing a primary and a secondary color together
i.e. blue-green
red-violet
Step-by-Step Instructions
1. Gather proper materials
Before beginning, you will want to prepare by gathering all the necessary materials. Some of these you may already have, but I have included a detailed materials list in the additional resources section of this unit with links for purchase or for use as a visual reference and guide as you gather your materials.
2. Use your ruler and pencil to guide you in tearing the paper in to four 11 x 15 inch pieces.
After you have gathered all necessary materials, the first thing we will do it tear our paper in four pieces.
The white Rives BFK paper comes in a 22x30 size and that would be a large surface on which to begin our color mixing adventure, so we will tear into four equal pieces.
To begin, mark the half-way point on the long edge (the 30inch side) of the paper. It will be horizontally oriented as you do this. Mark the half way point at the bottom and top of the paper.
You always need a minimum of two points to make certain when you line your ruler up it is a straight line across the page.
You can feel free to draw that line or simply line your ruler up against those two points.
Once you have your ruler in place, showing the half way point across the middle of the paper, you will take hold with your dominant hand of the paper. If right handed, along the top edge of the paper just left of the upper righthand corner of the paper, while holding the ruler firmly with your left hand.
You will then want to pull against the pressure of the ruler (firmly and decisively, but not too fast, watch for this part in the video) about an inch or two of the paper at a time. You will lower your hand and then pull up again against the pressure of the ruler another inch or two of paper, allowing it to rip a straight edge. Rock your arm by lowering it again and pulling again. Repeat this motion until you have gotten close to the other edge. The last motion will be the most decisive and quick, with the most pressure on the ruler, holding the rest of the paper down.
You have just created two, equally sized pieces of paper!
You will now repeat this process with these pieces of paper, dividing them in half along the 22 inch edge, creating a total of four sheets of high quality Rives BFK paper, measuring 11X15 inches each!
***If you are feeling super ambitious, don't let me stop you if you want to make a larger piece by using half of the paper or the whole paper but I like to do what I can to stay motivated and keep painting, so starting small using just 1/4 of this large paper is great. You can paint three more paintings or have three more mixing experiements after this one!
3. Taping the paper down
Now you will select one of your four equally sized sheets of Rives BFK paper to tape down to your painting board.
I like to eyeball about half way the distance of the tape to cover the paper. But many people really prefer to measure it out.
First you want to start by using taping your four corners down, covering very little of the paper, just enough to get it into place.
If you are using 1inch masking tape, use your ruler and pencil to draw a half inch edge around all four sides of your paper.
You will then use short pieces of tape (about 2-3 inches in length) to cover up that white edge and adhere firmly the paper to the painting board surface. Do this around all four edges of the paper.
This serves two purposes: 1) it keeps the paper from curling when you begin gessoing it and painting on it and 2) when you pull the tape off (slowly and more easily with the shorter 2-3inch pieces) it leaves a really nice clean white edge to our painted paper, giving it a more finished appearance.
4. Gesso Your Paper
Now, we are ready to prime our paper by adding a nice layer of gesso.
If you have a new jar of gesso, take your gesso brush and pull some gesso onto your pallette.
You wont need too much for this size of paper project.
Dip your brush in your cup of water to get it moist and mix that water in with the gesso, using a circular motion with your brush.
***if you have a jar of gesso that is not brand new but has some space in it for mixing, you can simply dip your gesso brush in water and go straight into the jar to pull the gesso out, I actually use a separate jar that is empty and mix the amount of gesso and water together in there that I prefer, as opposed to on the pallet, but either way is OK***
Then you will need to lightly smooth the gesso across the surface of your paper using your gesso brush.
Make certain to cover the entire surface of the paper as evenly as possible, all the way to the edges. It is OK to brush over the tape for the sake of priming the paper all the way to the edges. And, yes, paint will begin to get on your painting board and that is OK too!
The paper will slightly bubble during this process as it begins to absorb the moisture from the water and the gesso. That is expected and totally OK. Now wait for it to dry!
5. Lightly sand your dried gessoed paper
Once your gessoed surface has dried (depending on elevation and weather this could take 20 or 30 minutes or maybe even two hours if you live in a super tropical area) you will need to sand it down.
To know if it is fully dried simply touch the surface with your fingers lightly in multiple places to make certain it is dried all over and not still tacky and moist.
Now take your sand paper and lightly sand across the entire surface, edge to edge. You now have prepared your very own painting surface!
6. Create your grid
For the project I complete in the video, I divided my painting surface into four equal quadrants (measure across the half-way point in each direction of the paper, horizontally and vertically, drawing a line).
Then each quadrant is divided into 16 equal squares.
This is an easy way to begin, when our focus is primarily on color mixing and using this as a structure with which to explore our paint and color mixes. But if you are super bored with the equally sized squares, I have included some ideas on variation as well.
Part II How to mix color
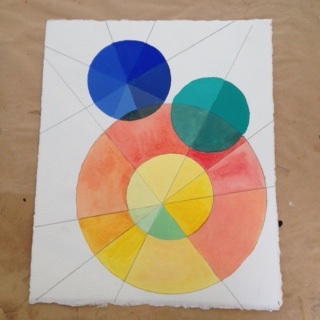
1. Explore the Color Wheel
Check out that color wheel!
Observe where the colors lie on the color wheel.
Colors opposite each other are complimentary colors.
When you mix complimentary colors together, they give you a "true grey" by "mixing each other down".
Complimentary colors also look amazing when you place them next to each other. They create a conversation as they talk to each other back and forth. Our eyes and brain love to enjoy these beautiful color mixes.
The three main complimentary color sets are made up of a primary and a second color.
Primary colors are RED, YELLOW, & BLUE. Secondary, colors are GREEN (made of yellow & blue), ORANGE (made of red & yellow), and VIOLET (made of red & blue).
The three main complimentary sets are RED & GREEN, ORANGE & BLUE, VIOLET & YELLOW.
Colors lying next to each other on the color wheel are called analogous colors, such as BLUE & BLUE-GREEN. They are neighbors and are very similar to each other. They also can create a wide variety of depth and interest when placed next to each other or when used throughout your painting.
2. Set up your palette
We will begin by setting up our pallet. Take your RED, BLUE, YELLOW, & White and place a small blob of paint of each on your palette. I prefer to place them along the outside edges of the pallet so that I can use the middle space as my mixing area.
3. Now it's time to paint!
You Can choose to explore the color mixes I did in the video or choose your own to complete your color chart!
Part III Completing Your Color Chart
1.Complete your entire color chart, exploring different color mixes and combinations.
2. Push yourself to try color combinations and mixes that "don't seem like they will turn out" just so you can see what happens. Push yourself to do color mixes and combinations that you don't necessarily "like" just to learn the possibilities.
3. Once the paint has dried, carefully pull up the tape to reveal a clean edge by keeping your fingers close to the surface of the paper and pulling the tape slowly, intentionally, and evenly at a low angle away from the painted surface.
4. Attempt a variation on this idea by creating a new abstract design and pushing your level of color sensitivity even further!
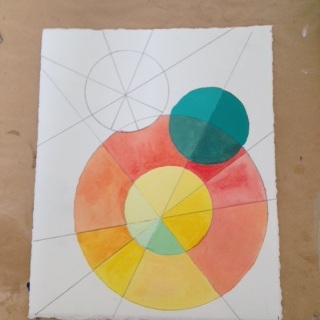
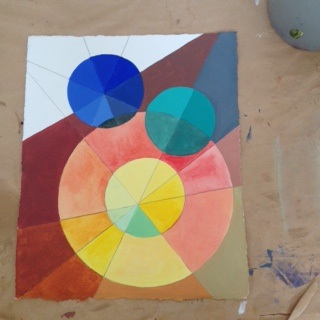
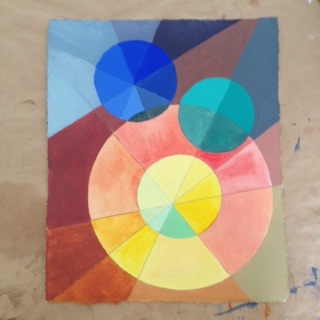
Idea Variations on Color Mixing Chart
In this one I used the bottom of glasses and jars to create the circles by tracing them and then broke them up with straight lines made with a ruler!
|
|
Art Talk #1: The Elements of Design
Goal of this Lesson
To understand the building blocks of Design on a deeper level, thus being more capable of breaking down complex visual art compositions into the more simple pieces that create them.
Appreciating the viewing process of art on a deeper level.
Increase understanding of the tools you are employing to create your own art work.
Visual Art Vocabulary
Line, Shape, Form, Space,Texture,Value,Color
Visual Art Examples
|
Mark Rothko, 1956 "Orange & Yellow"
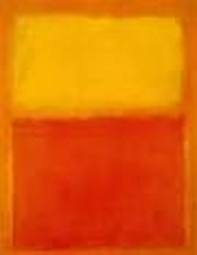
Notice how this piece by Rothko only uses color and shape.
|
Pablo Picasso, Line Drawing of a Woman
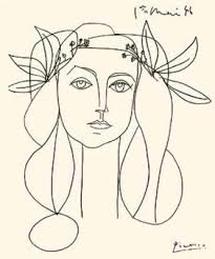
Notice how this piece by Picasso only uses line & shape.
|
After watching the above video, please feel free to peruse the slides from this lesson below at your own pace, taking note of each concept and enjoying the artwork!
