Technique Project #13:
Drawing Ellipses in Perspective
Drawing Ellipses in Perspective
|
Goal of this project
In this project we want to increase our abilities to draw from life and hone our brain, eye, hand coordination and translation of drawing in perspective, specifically ellipses in perspective. |
Supplies Needed
Your drawing pencils Drawing Paper Your ruler Your Gum Eraser Drawing Board Cylinder Shaped Objects to Draw (glasses, vases, jars, etc) Dowel Rod (optional) |
Step-by-Step Instructions
1. Observe that an object with a circular shape is foreshortened when the circle moves away from you in space.
2. Here are the most helpful practices when attempting to draw something in perspective:
Lock your elbow! When you are drawing & measuring in perspective and you bend your elbow, it distorts your translation of this perspective to a 2d surface.
Use something like a pencil or dowel rod that is straight to assist you. Pretend you are flat up against a plate of glass between you and the object, completely straight up and down.
Use your finger along the pencil to measure the length of the objects in space, like the length between the top and the bottom of the circle that is foreshortened, which will be compressed when the circle is not facing directly at you.
3. Pay attention to these guidelines for drawing ellipses:
The ellipse will never come to a point like a football shape. Make sure the sides have curves.
The bottom part of the cylinder is going to match the bottom part of the top ellipse exactly. Those curves should be the same.
4. When you are working on your drawings with these shapes, create the circle tool to help. Cut out a circle. Create two bold lines crossing the center of the circle as a perpendicular 'X' shape.
5. Remember to step back from the object to be able to observe the shapes properly.
Artistic Food for Thought
How many times have you tried to do a simple sketch while at a coffee shop in your sketchbook, only to realize that there was something strange about the mug in your drawing. Most of the time it is an ellipse in perspective issue, so I hope this lesson helps a lot! Use what you learn here to practice out and about in your sketchbook as well. Consider how you are setting up the space to draw, even when at a coffee shop. How far are you from the mug? Where is your sketchbook? Do you have to lift your head up and down looking from the sketchbook to the subject matter (mug)? Be intentional with how you give yourself space to draw, even when drawing in the wild!
How many times have you tried to do a simple sketch while at a coffee shop in your sketchbook, only to realize that there was something strange about the mug in your drawing. Most of the time it is an ellipse in perspective issue, so I hope this lesson helps a lot! Use what you learn here to practice out and about in your sketchbook as well. Consider how you are setting up the space to draw, even when at a coffee shop. How far are you from the mug? Where is your sketchbook? Do you have to lift your head up and down looking from the sketchbook to the subject matter (mug)? Be intentional with how you give yourself space to draw, even when drawing in the wild!
Technique Project #14: Painting from Life
|
|
Supplies Needed
Drawing Board Still Life Objects of your choosing Rives BFK, torn down to 10x 11 1/4' piece, gessoed and sanded Pencil (for light drawing use your 2H) Acrylic Paint & Paint Brushes Water cups, rags for cleaning brush while blending |
Step-by-Step Instructions
1. Choose an object to draw from life. When choosing this object, consider its positive and negative space, and choose something that is visually interesting to you because you will paint with more care, attention and meaning.
2. Start simple. Use small thumbnail sketches to become comfortable with your composition.
3. Start to draw on your paper with your pencil lightly at first (I suggest a 2H pencil) OR "draw" with a thin brush using a light wash-like paint line to draw in your composition directly onto your painting surface.
4. Block out the shape of your object, utilizing the spaces of the paper.
5. Be confident with your lines and the line qualities that you create. Check in and continue observing your object. Use your eyes!
6. Make micro-adjustments as needed to your rendering of your still-life.
7. Draw in a horizon line to put the object into a specific space.
8. Start mixing your paints to create the colors in your and begin painting!
9. Consider grounding the areas of your painting with a complimentary color which will help the layers of paint really vibrate with amazing richness. I definitely want to encourage you to continue to think of your paintings in layers. You will build your paintings in layers.
10. Observe the colors of your object and paint according to what you are seeing from life. This will take some time to get to and that is OK because the color will come as you observe and adjust! You already know how to mix & blend and now you are building in layers!
11. Remember to move your brush in every direction to really get your blends, not just up and down or side to side. This will create a very smoothing effect.
12. Make certain you have blocked in the main shapes before adding details. You've gotta have the cupcake before you add frosting and sprinkles!
13. Use the colors as inspiration and even change them a little (feel free to juice it up or mix it down!) if you want to give the impression of what something looks like rather than a purely realistic rendering.
14. Be conscious of positive and negative space in the painting as well as the light source in your still life.
15. After all the main shapes have been blocked in you can begin on the details. Make certain the "structure" of the rendering is solid before adding in those details in order for the painting to feel harmonious and balanced.
Additional Resources
I strongly encourage you to look at some other artists from art history who have used the background colors to anchor a figure into the painting. Mary Cassatt and John Singer Sargent are great examples of this in portraiture. Remember that a still life is a portrait of an object!
I strongly encourage you to look at some other artists from art history who have used the background colors to anchor a figure into the painting. Mary Cassatt and John Singer Sargent are great examples of this in portraiture. Remember that a still life is a portrait of an object!
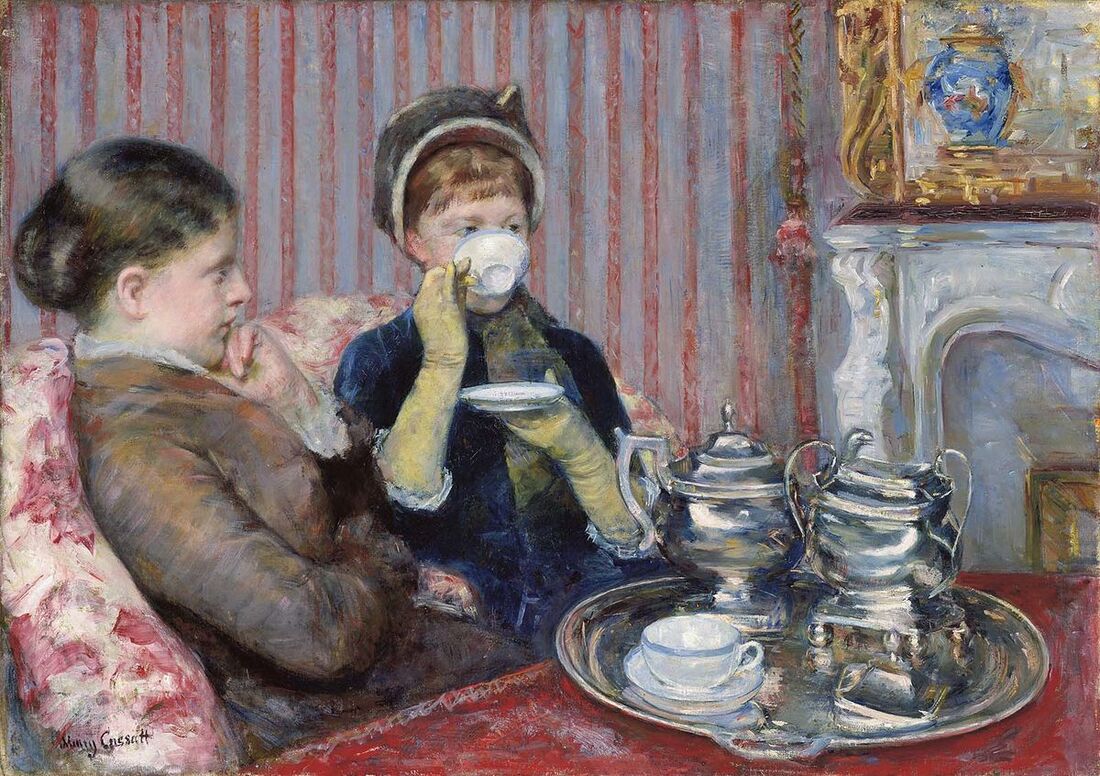
5 O'Clock Tea Mary Cassatt 1880
|
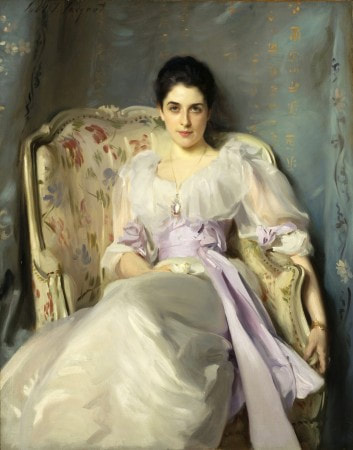
Lady Agnew of Lochnaw John Singer Sargent 1892
|
Design Challenge #7:
Playing with Color & Shape
Playing with Color & Shape
|
Goal of this Project
To head into uncharted territory! Play with the process of art and developing your own techniques and your own unique sense of design by just getting in there without a plan! When we reduce certainty we engage creatively. |
Supplies Needed
Frosted Vellum or other interestingly textured paper Images of figures/Magazines/visual fodder Watercolors & Watercolor brush/water X-Acto Knife & Cutting Surface Rubber Cement Spray Acrylic Paint/other mixed media materials Drawing Pencil |
Step-by-Step Instructions
1. Start by grounding the Vellum paper with watercolors of your choice. Consider layering and using interesting colors.
2. Let the painting on the vellum dry off to the side of your work space.
3. Choose a figurative image that includes the whole figure. This can be human or animal figures.
4. Layer the Vellum paper over the figure and trace the figure onto the surface of the painting.
5. Cut out the traced figure with your X-Acto Knife.
6. Use as layers in other works of art or in your sketchbook.
7. Consider color, shape and light while working on this Design Challenge.
8. No need to be scared of making mistakes! I do it all the time and ultimately it helps bring playfulness to our process while teaching us even more about what makes marks that we like or don't like and helps us to integrate all of this into our larger pieces of artwork!
Art Talk #7: Perspective & Playfulness
You can watch this art talk lesson here!
You can go through the slides of this art talk lesson here at your own pace!
