Technique Project #11:
Ruscha Inspired Drawings
Ruscha Inspired Drawings
|
Goal of this project
In this project we want to increase our abilities to compose a still life. We will focus on creating a still life that involves movement throughout the format. In choosing the subject matter of the ribbon we will create depth & dimensionality using the chiaroscuro technique with inspiration from artist, Edward Ruscha. |
Supplies Needed
Your drawing pencils Drawing Paper Your ruler Your Gum Eraser Drawing Board Ribbon (possibly tape to tape composition in place) Clamp Light |
Step-by-Step Instructions
1. Set up your still life using a wide ribbon. I recommend taping it down with your painters tape so that it will stay put for multiple drawing sessions.
2. Curl the ribbon a few times, giving it an interesting shape & structure. Use tape to hold in place. Make it interesting enough to keep you engaged through the duration of the project, but not so complex you will become bogged down. You can always do a second more complex design later!
3. Set up your clamp light or lamp to shine ( I always recommend from the side) in such a way as to give it visual interest by showing unique shadows & highlights. The shadows & light areas are what will give the drawing its dimension.
4. Create the size format you wish to draw in centered on your drawing paper. Often sizing something in like this on our drawing paper can help us stay focused on our drawing and not become overwhelmed with the scope of the paper.
5. Make certain when you are setting up your still life you are able to easily see both your drawing and your still life without having to move around a lot or craning your neck or leaning your body. This shifts your perspective and changes the drawing.
6. Beginning with your lightest pencil, draw the shapes in using the lightest amount of pressure possible, this way you can change the line-work if need be. You will notice that drawing shapes that have parallel running lines, such as the ribbon will present interesting challenges & also help increase understanding of perspective, overlap, and depth. Your eyes and your mind will play tricks on you, but keep looking and asking yourself, "What do I really see happening here?"
7. Begin to draw a value map in, breaking up areas of lightness & darkness.
8. Once you feel the drawing is as accurate as possible, begin your chiaroscuro shading with your lightest pencil and continue layering slowly increasing to darker values where necessary.
Artistic Food for Thought
Ed Ruscha, the artist who inspired this project, is well known for his use of text in his art work. While this project does not necessarily focus on the use of text in art work, I encourage you to look at the correlation between fine art technique and personal artistic concept in Ruscha's work. How can you begin to take some of the techniques we have been learning & explore your own personal concepts?
You can always take some of the projects we have been doing and kick it up a knotch. What if you did a still life of the ribbon as simply design, composition & technique AND then did a second drawing where you spelled something out? What words would you choose and why?
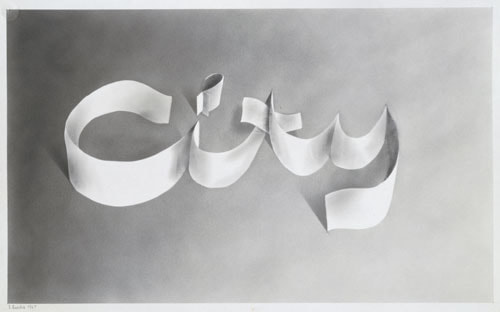
Ed Ruscha, City, 1967, powdered graphite on paper
(shared from the National Gallery of Art, www.nga.gov) |
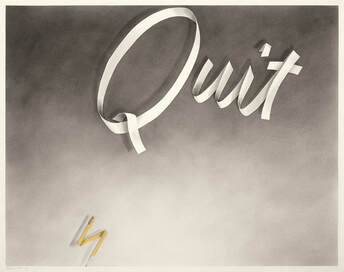
Ed Ruscha, Quit, 1967, gun powder and colored pencil on paper
(shared from the National Gallery of Art, www.nga.gov) |
Technique Project #13:
Drawing Ellipses in Perspective
Drawing Ellipses in Perspective
|
Goal of this project
In this project we want to increase our abilities to draw from life and hone our brain, eye, hand coordination and translation of drawing in perspective, specifically ellipses in perspective. |
Supplies Needed
Your drawing pencils Drawing Paper Your ruler Your Gum Eraser Drawing Board Cylinder Shaped Objects to Draw (glasses, vases, jars, etc) Dowel Rod (optional) |
Step-by-Step Instructions
1. Observe that an object with a circular shape is foreshortened when the circle moves away from you in space.
2. Here are the most helpful practices when attempting to draw something in perspective:
Lock your elbow! When you are drawing & measuring in perspective and you bend your elbow, it distorts your translation of this perspective to a 2d surface.
Use something like a pencil or dowel rod that is straight to assist you. Pretend you are flat up against a plate of glass between you and the object, completely straight up and down.
Use your finger along the pencil to measure the length of the objects in space, like the length between the top and the bottom of the circle that is foreshortened, which will be compressed when the circle is not facing directly at you.
3. Pay attention to these guidelines for drawing ellipses:
The ellipse will never come to a point like a football shape. Make sure the sides have curves.
The bottom part of the cylinder is going to match the bottom part of the top ellipse exactly. Those curves should be the same.
4. When you are working on your drawings with these shapes, create the circle tool to help. Cut out a circle. Create two bold lines crossing the center of the circle as a perpendicular 'X' shape.
5. Remember to step back from the object to be able to observe the shapes properly.
Artistic Food for Thought
How many times have you tried to do a simple sketch while at a coffee shop in your sketchbook, only to realize that there was something strange about the mug in your drawing. Most of the time it is an ellipse in perspective issue, so I hope this lesson helps a lot! Use what you learn here to practice out and about in your sketchbook as well. Consider how you are setting up the space to draw, even when at a coffee shop. How far are you from the mug? Where is your sketchbook? Do you have to lift your head up and down looking from the sketchbook to the subject matter (mug)? Be intentional with how you give yourself space to draw, even when drawing in the wild!
How many times have you tried to do a simple sketch while at a coffee shop in your sketchbook, only to realize that there was something strange about the mug in your drawing. Most of the time it is an ellipse in perspective issue, so I hope this lesson helps a lot! Use what you learn here to practice out and about in your sketchbook as well. Consider how you are setting up the space to draw, even when at a coffee shop. How far are you from the mug? Where is your sketchbook? Do you have to lift your head up and down looking from the sketchbook to the subject matter (mug)? Be intentional with how you give yourself space to draw, even when drawing in the wild!
Technique Project #15:
Drawing in Perspective Part II
Drawing in Perspective Part II
|
Goal of this project
In this project we want to increase our abilities to compose a from life by understanding more fully the principles of drawing in perspective. |
Supplies Needed
Your drawing pencils Drawing Paper Your ruler Your Gum Eraser Drawing Board Stack of Books or boxes |
Step-by-Step Instructions
1. Stack your items, either books or boxes, in such a way that the angles are moving in slightly different directions. This way you are seeing simultaneous "perspectives" at one time.
2. Focus on the structure of the still life objects, but keep a good distance from the objects to have enough room to see the objects properly.
3. Use your pencil, held vertically in your hand, and adjust your fingers on the pencil to measure the visual length and width of your objects. Keep your hand extended as far as possible and your elbow locked to keep the measurements accurate.
4. Begin drawing your books/boxes. Know that these objects are made up of parallel lines, which will affect each other in the drawing.
5. Lines that are perpendicular should all match up.
6. Adjust lines as necessary to keep the drawing in perspective. It helps to draw lightly. The darker your lines are the more "solid" they feel and "unmovable" they feel.
7. Leave any "wrong" lines there to help you adjust and learn what is going to help you get the angles correct. Actually, you can't "get this wrong" because it is PRACTICE! You are engaging in the process of training your eyes/brain/hand to work in concert translating a 3D reality onto a 2D sheet of paper and that is a "problem" to solve! Just take your time and practice. Art is a practice.
8. Use your ruler, if you like, to help you keep your lines parallel and straight.
9. Draw your lines straight through the objects so that you can be aware of what is going on behind the objects. This also helps you to not "curve" your line when you get close to the "edge" of the object.
10. Don't be afraid of running off the edge of the paper, so that you aren't forcing the drawing to fit into the space, which will skew the perspective.
11. Stay conscious and aware of your body position throughout the drawing so that the perspective stays the same.
12. Practice this project frequently to strengthen your ability to draw in perspective.
Technique Project #19:
Cross Contour Line Drawing
Cross Contour Line Drawing
|
Goal of this project
In this project we want to increase our artistic understanding of surface and volume. |
Supplies Needed
Your drawing pencils preferably H or HB (I am using 4B in the video for visibility purposes) Drawing Paper Your ruler Your Gum Eraser Drawing Board |
Step-by-Step Instructions
1. Begin drawing an object by starting at one singular point. In the demo video I am showing you Cross Contour technique by practicing drawing your own hand. This is the the easiest way to get started on this technique.
2. Draw the object's surface by using your pencil to draw lines contouring the shapes of the surface, much like "Art Ant", an ant that leaves a line as he walks back and forth across an object's surface.
3. Slowly work across the paper, filling in the surface of the object, studying the form and its shape.
4. Continue drawing in this manner, which is designed to train your brain in making important connections about studying surfaces & the mass/volume of an object, which will help in drawing realistically.
5. Take breaks if needed as this is a tedious type of drawing process and make certain not to strain your eyes or yourself from concentrating too hard.
6. Adjust as necessary by just adding onto the drawing. Cross Contour Line Drawings are all about learning about the volume and surface of a subject matter.
Technique Project #23: Adding Personal Narrative to your artwork
|
Goal of this project
In this project we will increase our ability to play with the balance of abstraction and reality by balancing real space & value with a dynamic juxtaposition of our self-portrait and an object of meaning. |
Supplies Needed
The photo of yourself from the pencil chiaroscuro portrait drawing project (a High Resolution photo with good contrast) One Visual Item/object to interact with this portrait (an item that is somehow personal or meaningful to you) Your drawing pencils or other drawing/painting materials Drawing Paper or Rives BFK Paper Your ruler Your Gum Eraser Drawing Board |
Step-by-Step Instructions
1. Expand your picture plane on the drawing surface.
2. Draw a couple of thumbnail sketches on a separate sheet of paper to play with the composition of this piece.
3. Begin drawing on the paper with pencil and sketch the portrait of yourself.
4. Start to play with imagined space and begin to integrate the object into the composition surrounding your portrait.
5. Consider shape and movement when integrating your portrait and object together in the space.
6. Begin to use the full range of value to balance the composition and to emphasize certain areas that you would like to focus on.
7. Allow the object to tell a story about you as the piece evolves.
Artistic Food for Thought
How can you integrate and tell stories about yourself or others through abstracting space and interspersing it with object, shape, color, movement to tell us more about the figure in the artwork and their internal world?
How can you integrate and tell stories about yourself or others through abstracting space and interspersing it with object, shape, color, movement to tell us more about the figure in the artwork and their internal world?
