Technique Project #11:
Ruscha Inspired Drawings
Ruscha Inspired Drawings
|
|
Supplies Needed
Your drawing pencils Drawing Paper Your ruler Your Gum Eraser Drawing Board Ribbon (possibly tape to tape composition in place) Clamp Light |
Goal of this project
In this project we want to increase our abilities to compose a still life. We will focus on creating a still life that involves movment throughout the format. In choosing the subject matter of the ribbon we will create depth & dimensionality using the chiaroscuro technique with inspiration from artist, Edward Ruscha.
In this project we want to increase our abilities to compose a still life. We will focus on creating a still life that involves movment throughout the format. In choosing the subject matter of the ribbon we will create depth & dimensionality using the chiaroscuro technique with inspiration from artist, Edward Ruscha.
Step-by-Step Instructions
1. Set up your still life using a wide ribbon. I recommend taping it down with your painters tape so that it will stay put for multiple drawing sessions.
2. Curl the ribbon a few times, giving it an interesting shape & structure. Use tape to hold in place. Make it interesting enough to keep you engaged through the duration of the project, but not so complex you will become bogged down. You can always do a second more complex design later!
3. Set up your clamp light or lamp to shine ( I always recommend from the side) in such a way as to give it visual interest by showing unique shadows & highlights. The shadows & light areas are what will give the drawing its dimension.
4. Create the size format you wish to draw in centered on your drawing paper. Often sizing something in like this on our drawing paper can help us stay focused on our drawing and not become overwhelmed with the scope of the paper.
5. Make certain when you are setting up your still life you are able to easily see both your drawing and your still life without having to move around a lot or craning your neck or leaning your body. This shifts your perspective and changes the drawing.
6. Beginning with your lightest pencil, draw the shapes in using the lightest amount of pressure possible, this way you can change the line-work if need be. You will notice that drawing shapes that have parallel running lines, such as the ribbon will present interesting challenges & also help increase understanding of perspective, overlap, and depth. Your eyes and your mind will play tricks on you, but keep looking and asking yourself, "What do I really see happening here?"
7. Begin to draw a value map in, breaking up areas of lightness & darkness.
8. Once you feel the drawing is as accurate as possible, begin your chiaroscuro shading with your lightest pencil and continue layering slowly increasing to darker values where necessary.
Artistic Food for Thought
Ed Ruscha, the artist who inspired this project, is well known for his use of text in his art work. While this project does not necessarily focus on the use of text in art work, I encourage you to look at the correlation between fine art technique and personal artistic concept in Ruscha's work. How can you begin to take some of the techniques we have been learning & explore your own personal concepts?
You can always take some of the projects we have been doing and kick it up a knotch. What if you did a still life of the ribbon as simply design, composition & technique AND then did a second drawing where you spelled something out? What words would you choose and why?
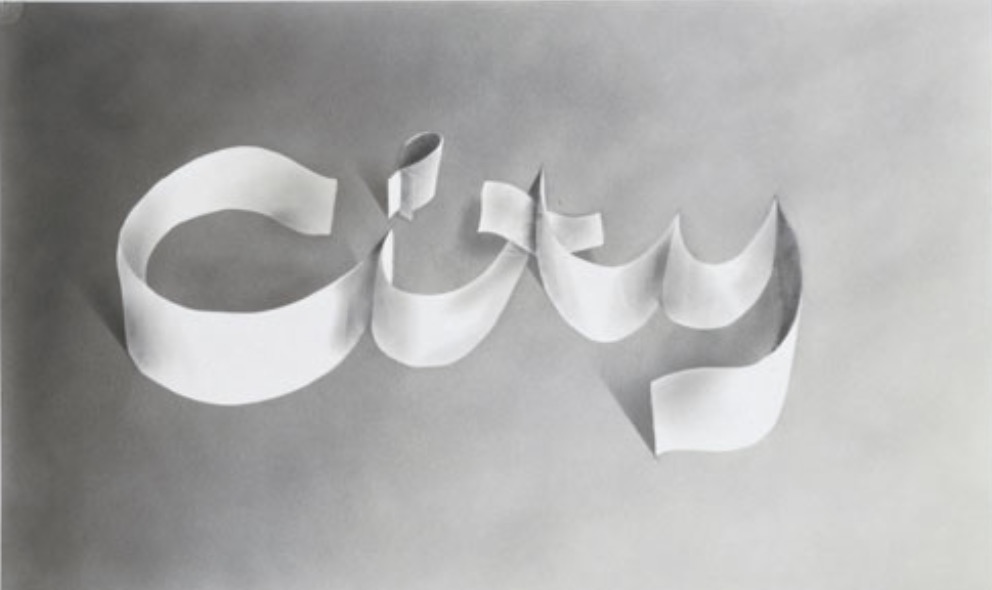
Ed Ruscha, City, 1967, powdered graphite on paper
(shared from the National Gallery of Art, www.nga.gov) |
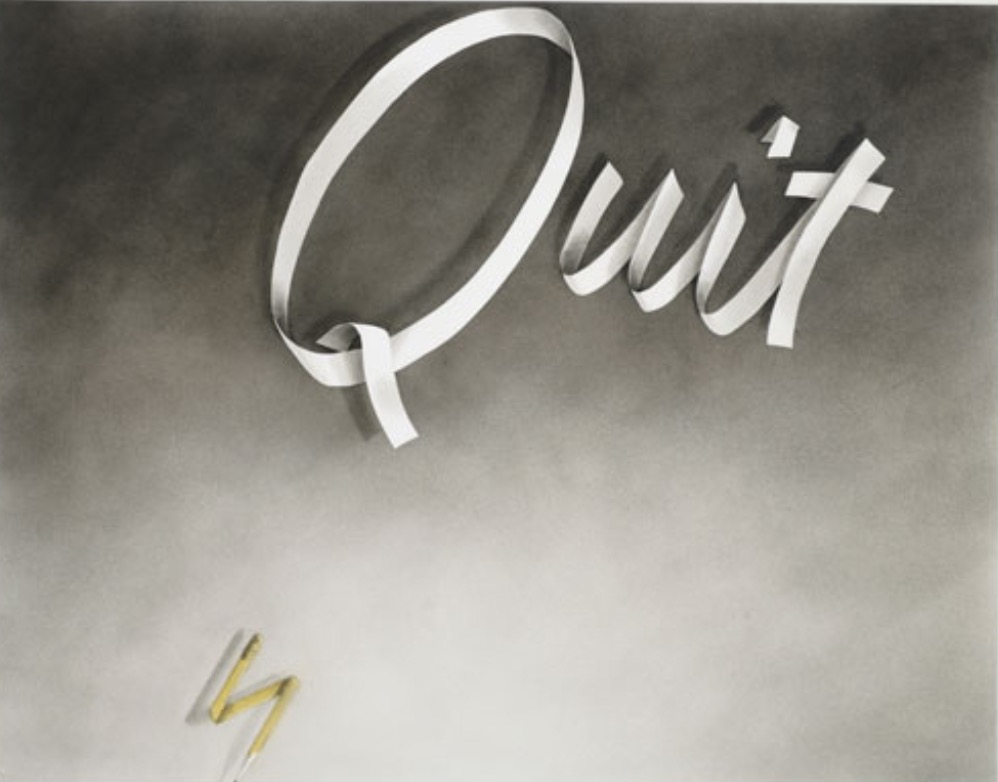
Ed Ruscha, Quit, 1967, gun powder and colored pencil on paper
(shared from the National Gallery of Art, www.nga.gov) |
Technique Project #12: Gesture Line Drawings in Vine Charcoal
|
|
Supplies Needed
Large Newsprint Paper Vine Charcoal (I like Windsor & Newton) Painters Tape (Optional) Drawing Board (Optional) Objects to Draw ( I recommend items with interesting shape that have noticeable movement) |
Goal of this project
This project is another exercise in training our brain and hand and eye to all work in concert together, while developing our unique artist "hand" or our own "line quality". This also helps us to develop a feel for drawing and working on a larger surface and creating a composition of movement and interest.
This project is another exercise in training our brain and hand and eye to all work in concert together, while developing our unique artist "hand" or our own "line quality". This also helps us to develop a feel for drawing and working on a larger surface and creating a composition of movement and interest.
Step-by-Step Instructions
1. Choose Subjects for gesture drawing and begin drawing them on your newsprint paper in a large, sweeping style.
2. Fill the whole page and draw constantly, not too fast and not too slow.
3. Lift Charcoal for lighter lines or press harder for darker lines, varying the pressure as you go to create diversity in your mark making.
4. Pay more attention to the general movement and feeling of the subject rather than every little detail.
5. Create several gesture drawings in a single sitting with multiple drawings per subject matter if you would like. After all, we tend to be more interested in drawing things we are attracted to visually.
6. This practice of drawing is a great warm-up prior to beginning an extended drawing/painting project as well as an incredible practice in and of itself!
Design Challenge #6:
Collage of Movement
Collage of Movement
|
|
Supplies Needed
Your Visual Journal or Drawing Paper Color photos from Magazines X-Acto Knife Rubber Cement Ruler Drawing Pencil or fine point micron pen |
Goal of this project
Strengthen your sense of composition, design, and movement with this design challenge! What is great about playing with these design concepts in a collage like this, is it tends to be low risk. It isn't necessarily something you become super emotionally invested in, like a piece of art you have longed to make for years! So go ahead and explore these design principles here so you can apply them to your heart's desire art later!
Strengthen your sense of composition, design, and movement with this design challenge! What is great about playing with these design concepts in a collage like this, is it tends to be low risk. It isn't necessarily something you become super emotionally invested in, like a piece of art you have longed to make for years! So go ahead and explore these design principles here so you can apply them to your heart's desire art later!
Step-by-Step Instructions
1. Choose different photos from magazines with the consideration of colors and patterns you find unique.
2. Use your ruler and a pencil or fine point pen to mark out shapes on the photos.
3. Use your X-acto blade and ruler to cut the shapes out.
4. Start to arrange the pieces on your paper or sketchbook to create a composition with movement, rhythm and unity. Pay attention how the shapes interact and create movement as well as the colors.
5. Rearrange or continue cutting pieces to create new compositions and explore new alternatives.
6. Consider the principles of design: repetition, rhythm, variety, and an overall sense of harmony. Focus on how your eye is moving through this collage.
7. Once you've created something completely different and ultimately stronger and more interesting than what you originally envisioned, start to glue down the pieces with your rubber cement to complete this project.
Art Talk #6:Getting Visually Hungry
Watch this video for the Art Talk lesson!
You can review the slides from the video here at your own pace!
